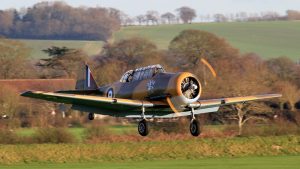
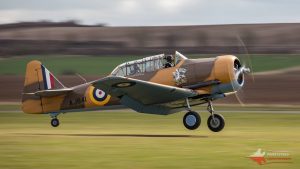
Harvard landings
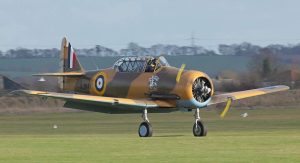
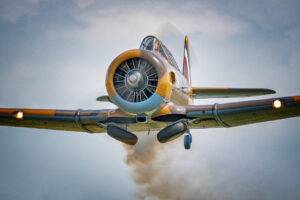
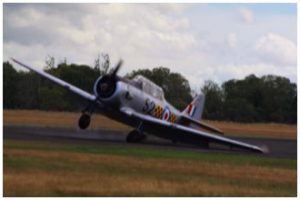
Pinning the Wacky Wabbit down on the bumpy grass at Duxford Imperial War Museum – Tail high with the main wheels glued down with a touch of left rudder. Slightly tail high due to the undulating grass at the beginning of runway 24 grass!!
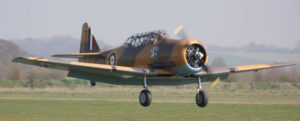
To wheel or not to wheel? – That is the question! The correct technique to land a Harvard always seemed to be the dilemma when I first started flying the Harvard. When I flew the Auster, life was simple, I was told to 3 point her every time, so I never considered anything ‘other than a 3 point landing –
Harvard Landings – To wheel or not to wheel, that is the question?
 After much deliberation and chatting with other Harvard pilots, I decided to wheel the Harvard when there is a cross winding excess of 10 knots and 3 point land below 10 knots. Techniques such as this seemed to go with the consensus and general opinion, however! I recently went through a phase of ‘only’ 3 pointing the Harvard on every landing, even in a 15 plus knot crosswind with full flap, I may say with excellent results. So the question remained to wheel on or 3 point?
 As I write this article (April 2021) with just over 350 hours on the Harvard, my personal choice is to 3 point land or “Normal Landings”, as pilots called them in the 1940s and ’50s. Having recently flown 10 hours in the P51 Mustang in the USA, where every landing was wheeled, I can definitely see the merits in wheeler landings versus 3 pointers in some circumstances. I still train and bash the circuit; I like to mix it up a little when doing the circuit work. I find swapping between wheelers and 3 pointers work well as I am far from perfect!
I sometimes arrive for a beautiful 3 pointer and then find the two front main wheels touch first! When this happens, I quickly convert the plan to a low tail wheel landing by a quick check forward on the stick and stay in complete control – “I think because I frequently alternate my landings, I get surprised less!” The best article I have read on landing the Harvard is by Kent Beckham of the Canadian Harvard Aerobatic Team, “Avoiding the ground loop” https://www.t6harvard.com/pilot-stories-2/avoid-ground-loops/ I have listed his item in the pilot’s section of this website. I completely agree with everything mentioned in this article and have used his wisdom for many years now.
The Harvard is consistent.
 The only assumption you can make about a T-6 at all is that it will swerve one way or the other, and you can’t be sure which way. So you plan accordingly, getting your nerves and feet ready to handle whatever it dishes out. The results of a radical swerve can be exciting-like crumpled wings, folded landing gear, etc. If you do it right, you’ll get rewarded with a view of the airport from an upside-down position alongside the runway. The trick is to catch the swerves right at the beginning while they are still tiny turns. Nip each of those in the bud, and the aeroplane is no problem. It only gets nasty if you let the nose wander too far before getting your feet in the act.
Understanding the controls
 Having spoken to many pilots who don’t fly aircraft with the traditional undercarriage, they all seem to talk about rudder control as if that’s the ‘only control’ you need in a crosswind… I have to say that the rudder is very important; however, it is not the only control you need, it is a combination of rudder and aileron – What about the poor old aileron? The aileron always seems to get left out of any debate on taildragger flying and doesn’t seem to come up in conversation when discussing ground loops. Hmmmmmmm, ok, read on!
I break down the controls into 4 easy segments, so easy even I can understand them! –
- Rudder – Direction (yaw)
- Aileron – Used to stop the drift
- Control Column – Speed stick! Speed control
- Throttle – Up and down lever
 Rudder – Ok, let’s talk about the rudder – This is an essential part of tail dragger flying primarily in the take-off landing phase, even more importantly in a crosswind. As I have bullet-pointed above, the rudder controls direction. So as I see the nose wander right, I immediately counter with the left rudder and vice versa. The technique for using the rudder is critical as you need to correct quickly for any directional changes; however, carefully as you can either overcorrect by being too aggressive or react too slowly with severe consequences. I have developed a technique of dabbing the rudder with short positive jabs to keep direction. For example, with the wind from the left, the Harvard will want to weathercock into the wind to assume the right rudder? The right rudder is the correct answer to bring the nose ‘right’; however, the secondary effect of yaw is roll, in this case rolling to the right….. So what we have now is the ‘into wind’ wing lifting (left-wing in this example), which is not desirable, so the left stick would be required in this situation to hold down that into wind (left) wing… Getting the idea?
 Aileron – The aileron comes into its own during the crosswind landing, as mentioned above. If the wind is from the left, the stick needs to be into the wind or over to the left enough to stop the drift. If you land a Harvard with push, you will possibly end up in a ground loop. The aileron into the wind holds down the in to wind wing; if the wing is allowed to lift, it will weathercock the aircraft into the wind. In a situation where the wind is coming from the left, the plane will try and turn its self to the left, so the novice pilot will try and correct with the rudder… The pilot should hold that wing down into the wind and keep direction with the rudder. In this situation, most of the weight should be on the wind wheel. There is a lot of dihedral on that wing, and it’s easy for the crosswind to get under the in to wind wing and lift it! However, as previously mentioned, as you hold that wind down with the left aileron in this example, the secondary effect is for the machine also to yaw left, so now we need a right rudder. As we can see, this is a real stick and rudder flying!
 Speed – A stable approach is what we are looking for to get that stable landing. We should be looking for 90 mph on the clock. The aircraft has to be in the correct attitude and trimmed to hold the speed. The pilot should also check the vertical speed indicator (VSI) to see that there is not an unusually high rate of descent. Around 500 – 700 feet per minute should be good for the stable final approach. For this, I concentrate on using the “Speed Stick” or the control stick. Stick input is how I set the speed setting the correct attitude and trimmed.
 Throttle – I think of the throttle as the up and down lever. The aircraft speed is set and corrected by the control column and trimmed off on the final approach. If the aircraft is low on the approach path, the pilot should use the throttle to arrest descent or throttled off if the plane is too high. I have found with the Harvard that in the landing configuration with gear and full flap engaged, the vertical descent can be around 1800 feet per minute with the engine at idle! So as we can see, the rate of descent is governed by power. My standard power setting in the Harvard for the final approach is 15 inches of MP, and the RPM forward to 2250 for landing.
Land into the wind!
It really should go without saying – “please land the Harvard into the wind”! Below is a Harvard landing with a tailwind at Edinborough a few years ago. It simply gets to a point where the aircraft slows down and the tailwind from behind is more powerful than the wind speed passing over the aircraft control surfaces from the front. In a Harvard, it’s not going to end well!
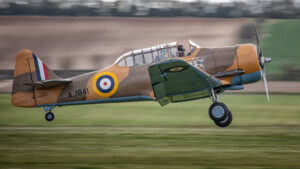
Wheeler landing
Let’s look at some advantages –
Maximum controllability of the aeroplane through the touchdown point
Reduced susceptibility to being blown about by gusts
Improved visibility during the landing run
Ease of transition from one taildragger type or model to another. In the early part of the flare out, let the main wheels contact the ground with minimum downward velocity. Advisable to carry a little power
Wheeler landing execution
*The wheel landing is executed by letting the aeroplane contact the ground on the main wheels first, followed by an immediate application of forward elevator to reduce the angle of attack and keep the wheels glued on.
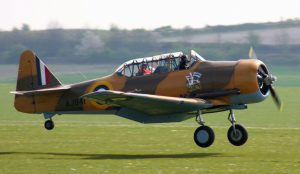 On the final approach, the aircraft should be stable and speed correct around 90 mph with a small amount of power, approximately 15 inches. As I descend to land, just before touch down, I aim to fly low level down the runway at around a few feet, gradually getting lower, waiting for the main wheels to touch, still carrying around 80-90 mph. The aileron needs to be fed into the wind keeping the wing down into the wind and making small throttle adjustments for height.
On a very windy day, I aim to land on the in to wind wheel first, which is actually one wheeler. As the wheel(s) touch, the control stick is checked forward with a dab of forward stick or relaxation of pressure; in some cases, the aircraft is kept straight with rudder, and crosswind drift is corrected by more aileron. The aircraft will continue on the two main wheels until the airspeed decreases, and at this point, the pilot will fly the tail down while there is sufficient airflow over the elevators. With the tail now down, the pilot has to keep direction with rudder, NOT forgetting to keep that stick in to wind. On a windy day, it is not uncommon for me to finish the rollout with the stick hardback and fully over into the wind as the aircraft comes to a standstill.
Below – Quicksilver P-51 wheeler landing with a right crosswind – A perfect demonstration bt the world-famous P-51 pilot “Scooter” As you can see, the pilot lands with the right-wing down into the wind allowing that into wind wheel to land first. Just enough aileron is used to allow the downwind wheel to settle due to gravity. All this time the pilot will keep feeding the control stick into the wind keeping that into the wind wing down as he starts to lower the tail wheel onto the runway.
As with the T6 Texan and Harvard, the P-51 has a locking tailwheel that operates in exactly the same way. As the tail wheel makes contact with the runway the stick is held back to keep the tail wheel locked but “Importantly” The stick stays into the wind at all times while directional control is maintained with the rudder.
In my opinion, the single biggest cause of Harvard ground loops during crosswind operations is due to the pilot allowing the into wind wing to lift during the landing. The Harvard has quite a large Dihedral angle on the wing and it’s easy to allow the into wind wing to lift it thus weather cocking it increasing the drag, slowing it down allowing the aircraft to swap ends! Any crosswind and that stick must be into wind and not central. Even if it’s just a little wind, “Pay attention to it”!
As you slow down the airflow over the ailerons decreases, reducing their effectiveness, resulting in more lift caused by the dihedral in the upwind wing and an unrelenting crosswind. As the aircraft starts to weather cock into wind the weight is transferred to the downwind gear leg increasing its traction but – whoa – it’s no longer aligned with the runway. You stomp on full downwind rudder and maximum brake to stop the swerve. If it ever takes hold, your window of opportunity to release it is extremely small, chances are that you’ll overcorrect and spin out into the beans scaring the worms silly with a wingtip.
Flaps – If I were to do a wheeler landing on a calm day, I would opt for the full flap as I personally like the aerodynamic braking I get from the entire span outer and centre flaps; some may say this is negligible; however, I find it noticeable. I used to fly A Harvard without the centre flap and found the machine took longer to slow to a full stop. Some say that during a wheeler landing with full-span flaps, the rudder’s airflow is blanked to a small degree and suggests only using the half flap. My personal opinion is when wheeling in clam conditions, use full flap and in windy crosswind conditions, wheel on using half flap only. Techniques such as this work for me every time; however, have a play and make up your own mind!
The wheel landing is executed by letting the aeroplane contact touch the ground on the main wheels first, followed by an immediate application of forward elevator
Wheeler landings – points to note:
*Perform a standard approach at correct speeds
In the early part of the flare out, let the main wheels contact the ground with minimum downward velocity. Advisable to carry a little power
Immediately apply forward stick to keep the aeroplane on the ground. The required amount of forward stick would be small if the rate of descent were low. Ease off the power carried during the approach.
Continue increased forward stick application to keep the tail up before flying the tail down under control at around 40 mph (Harvard) and locking in the tail wheel. When the rear is flown down at too high an airspeed, the attack angle increases, and you may become airborne again!
Once the tails lowered, hold keep the elevator fully aft, keeping the tail on the ground.
* Compleat taildragger pilot – Harvey’s S Plourde
Below – A short wheel landing video
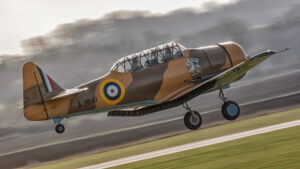
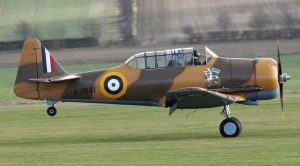
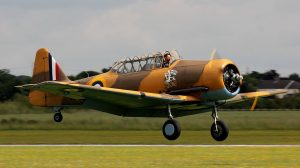
Three-point landing
*The most straightforward approach to the three-point landing is to consider that the aeroplane is flown parallel and close to the ground as long as possible until it stalls and settles to the field of its own accord. At that time, it will sink to the ground three points regardless of the type of aeroplane. Remember that the stick should be all the way back at the time of contact and should be held there through most of the landing roll. If the above is understood and followed, there should be no bounce because the conditions conducive to generating a skip or bounce will be absent.
This is a standard three-pointer about 1 second from touch down
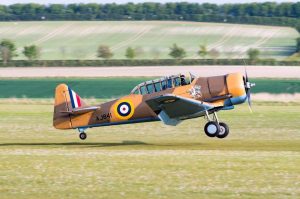
The approach and flare
I am flying low to the ground at around ‘one or two feet. I raise the nose until the cowl intersects the horizon and close the throttle. All the above still applies, and I keep the stick in to wind to arrest any drift all the way until the three wheels touch down. It’s usual to land with the main wind wheel in a strong crosswind and tailwheel in a two-pointer, with the downwind wheel slowly making contact with the ground… Though the stick is held back, it must remain over and into the wind holding the in to wind wing down. For me, I prefer the 3 point landing as it’s normally a full stall landing, and all 5300 pends of aircraft is now down and below flying speed on all three wheels, which is a safer place in my opinion than teetering; on the two wheels of the wheeler landing… However, all this can be discussed and debated over a beer because, as we always say, “Any landing you walk away from is a good one”! The real key to the three-pointer is having spatial awareness and peripheral vision to read the external visual cues that stop you from flaring too high and raising the nose too much. All this, however, comes with practice, practice, and then a little more practice…
The most straightforward approach to the three-point landing is to consider that the aeroplane is flown parallel and close to the ground as long as possible until it stalls and settles to the field of its own accord.
A friend of mine that flew Hurricanes during the war said to me, “Whats a wheeler landing anyway”? He couldn’t understand why anyone would not want to land a Hurricane or a Harvard for that matter ‘not’ in a three-pointer…..
Three-point landings – points to note:
- *The approach is no different whether the aeroplane is a nose dragger or a taildragger
- The aircraft is gradually flared out close to the ground – within a foot or so
- A serious attempt is made to keep the aeroplane flying as long as possible by easing progressively back the elevator to maintain proximity to the ground without touching it. This must be a continuous motion.
- When the aeroplane fully stalls, it will drop to the ground on all three wheels and be guided straight throughout the roll-out.
- The stick must be held fully back and not released as in nose dragger landings.
- Brakes should not be applied unless needed, and then only sparingly and with a pumping motion.
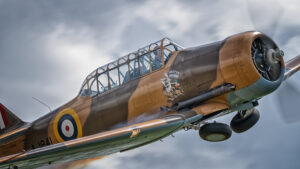
Tail first landing
*The question is often asked by transitioning pilots as to the possible dangers of making a stall landing during which the tail wheel strikes the ground before the main wheels do. The answer is that there is nothing wrong with this manoeuvre because it is not likely to create a bounce. The reason for this is that when the tail wheel contacts the ground, either one of the two following actions will take place:
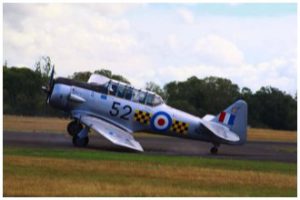
This is a classic flare for the three-point landing, which was a touch high; however, it settled into a three-pointer slightly tail first on this occasion – As I said, I’m only human!
Tail first landings – points to note:
- The tail wheel will immediately bounce off the ground resulting in a decrease in the angle of attack with resulting loss of lift.
- The tail wheel will stay on the ground, and the C of G’s downward momentum will cause the main wheels to descend closer to the ground.
In either case, the result is that the angle of attack is decreased immediately following the first contact with the ground. This will participate in a reduction in lift. Hence the aeroplane will soon rest solidly on the ground.
* Compleat taildragger pilot – Harvey’s S Plourde
WHAT IS A GROUND LOOP?
Ground loops result from the loss of directional control. What flight control is most critical for directional control? The rudder you say! What if I told you that the reason Harvard’s ground loop is because of a lack of aileron usage?
Any Harvard Ace will tell you that you need the right rudder and plenty of right rudder trim for takeoff, but that’s only half the story. You need a left rudder for landing. The vertical fin is offset such that a full right rudder is not required for take-off and none should be required for a normal cruise. Since this fin is not adjustable in flight, it still commands the aircraft to the right when the power is brought back to idle for landing. (Not landing at idle power? Bad pilot – very bad pilot – you are now rendering your landing gear warning horn useless, and increasing the runway length required. How are you ever going to know how to land when the fan quits?) In order to prevent the aircraft from going right into the rhubarb, the left rudder is required when the throttle is closed.
Do you close the throttle at round out? This requires you to flare, add left rudder, and correct for any crosswind with aileron, all at the same time. You have trouble walking and talking on a cell phone at the same time, but try to control all three axes in gusty crosswinds and you wonder why the landing isn’t working out as well as you had hoped.
It doesn’t matter that you slid it on slicker than shoe soles on wet ice, nor that the track and heading are aligned, for as you slow down the airflow over the ailerons decreases, reducing their effectiveness, resulting in more lift caused by the dihedral in the upwind wing and an unrelenting crosswind. As the aircraft starts to weather cock into wind the weight is transferred to the downwind gear leg increasing its traction but – whoa – it’s no longer aligned with the runway. You stomp on full downwind rudder and maximum brake to stop the swerve. If it ever takes hold, your window of opportunity to release it is extremely small, chances are that you’ll overcorrect and spin out into the beans scaring the worms silly with a wingtip. Speaking of which, a tip touch with its wingspan arm and moment will instantly pivot you sideways.
If (The English language does no justice to a word so mighty by representing it with only two letters.) you applied full aileron and some opposite rudder you would have made a nice save. Better yet, if (Oh – so powerful a word!) you eased in full aileron as the speed diminished you’d be taxiing to the hangar floating in the cockpit swelling with pride – bound only to earth by the seat belts; instead you’ll need to try and relax the sphincter muscle to remove the seat cushion.
I feel a little out of place preaching about something that I’ve never experienced. I spent ten consecutive years in the back seat (several out of Woodstock in the short runway days) instructing on Harvards. I have lost tail wheel steering, blown tail tires, and even landed with the whole thing missing – but I have never experienced a ground loop. Touchwood, (kind of hard to do in a metal aeroplane) or better yet… use aileron! (Kent Beckham)

In conclusion
So, in conclusion, at the time of editing this post, I have to admit that I am a “Normal Landing” type of guy which is the three-pointer landing to most or, as mentioned earlier, the “Traditional Landing” The Harvard seems to love this type of landing as you land the aircraft on to the ground just above the stall in conditions where I have a crosswind less than 15 knots. Not one to get complacent, though. I do have days where I train specifically in the circuit and wheel the Harvard onto the tarmac and the grass runway at Duxford, as I know that on days where I have a crosswind above 15 knots, I will wheel the Harvard onto the runway.
I was once coached by a very experienced warbird pilot who told me not to take whatever landing I got as this is unacceptable. He wanted me always to decide what landing I would do and command the aircraft to do what I wanted! So, for example, now when I land, I always say to my self “This will be a wheeler” or “This will be a 3 pointer”, and I do my best to make that command happen. I also have my own personal limitation rules, where I would not wheel a Harvard on to what I would consider a short runway and would always opt for a 3 pointer.
I hope this short article has been interesting and useful, but whatever landing you do, decide on keep it straight, don’t let it wander more than a couple of degrees left or right, and it is not over until the aircraft has come to a complete stop!
Written by Andrew Goodall
Harvard owner/Display pilot
A few videos for your enjoyment
Andy Goodall T6 Harvard Ltd owner and pilot, arriving for a three-point landing at Duxford runway 24 with the wind 200/20 knots (Video Steve Keeler “High Flight”)
This is a clip of myself landing the NA 64 YALE at Duxford. I am flying the aircraft as long as possible as the speed drops off low level, just a few feet off the ground. I’m keeping the nose on the horizon and gradually flaring more into the 3 point attitude. On this occasion, the wind was from my left, so the Yale wanted to yaw to the left, so the left stick into the wind to kill the drift and right rudder to keep direction… As you can see, those “little feeties” and the right rudder is working hard. During the landing, the stick is held in to wind and fully aft, as you can see by the up elevator. 05/05/2019
————————————————————————————————————-