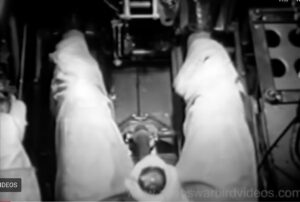
HARVARD PRE-START TAXI & TAKE-OFF
I wrote the article on Harvard Landings https://www.t6harvard.com/pilot-stories/t-6-landings-by-a-goodall/ in 2018 and have constantly updated it as I learn new techniques and gain more experience on various Harvard’s, Texans and S.N.J.’s. It occurred to me that the take-off needed some attention too, so this is my experience gained over ten years of flying the Harvard/Texan to achieve a smooth, safe take. The notes below are what I used on my Class Rating Instructor Course (C.R.I.) and when training new Harvard pilots, specifically Harvard 4 CC&F G-BJST. I have referenced notes where possible.
Content:
- The walk around
- The start
- Taxi
- VIDEO – ‘Tail wheel locking mechanism’ video
- Run-up
- Take off
- Engine management
- Going the distance with the radial
- VIDEO – ‘Gear retraction video’
- Getting airborne
- Engine limitations
- Shut down
THE WALK AROUND
I won’t go into much detail here as everything you need to know on the checklist, well, nearly everything! https://www.t6harvard.com/wp-content/uploads/2018/08/EO-05-55A-1-Pilots-Operating-Instructions-1.pdf(Page 27)
The checklist doesn’t detail human factors for the eager and excited pilot! Approximately 80 per cent of aeroplane accidents are due to human error (pilots, air traffic controllers, mechanics, etc.), and 20 per cent are due to machine (equipment) failures. It doesn’t matter if you are a complete newbie or a seasoned pilot mistakes frequently happen on the walk around, leading to a less-than-desirable event. So let’s look at some examples I have seen or heard of over the last few years.
 As we prepare the aircraft for flight, we tend to take things out of the rear luggage compartment, such as oil, boxes, fuel strainers and rags etc. and place them on the ground and on top of the wings etc. but remember these all must go back into the luggage compartment before engine start!
Personally, having done the walk around as per the checklist, before climbing into the cockpit, I do a complete 360* area sweep of the aircraft, and this includes a good look underneath the aeroplane and a good look around the aeroplane and a good look in front of the aeroplane for obstacles and potential hazards such as other aeroplanes, tractors, tugs tow bars soft ground spectators and the list goes on!
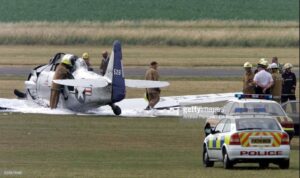
Below: A Harvard takes off with the tow bar still connected. This isn’t an isolated incident, and I have heard of this happening before. Remember always do a 360* area sweep around the aircraft before climbing in.
It might surprise you to note that a pilot has told me with many thousands of hours on warbirds that they once taxied forward in their Harvard with the towing “A” frame still attached to the undercarriage. Remarkably they may have taken off if they had not been alerted by a member of staff who was running alongside frantically waving their hands in the air! So, yes, this s a true story; however, I shall protect the name and location.
This tells me that if this could happen to this warbird god, this could happen to anyone. I have seen steps used to check the oil and then left by the prop prestart; I have seen oil caps not secured. The oil flap is left open; I have seen the rear canopy left wide open as the pilot taxis out; parachutes are left on the tail, and chocks are not removed as the pilot tries to taxi (unsuccessfully). Finally, pitot tube covers are still on the tube, and all of these things are on the Harvard!
Please don’t forget the all-important internal F.O.D. Check, I always take time to peer inside the aircraft looking for anything from lost mobile phones, coins, sunglasses and other offending items; remember, a well-placed and stuck Bic biro could jam the controls and ruin your day. One of my instructors once lost his mobile phone, and he couldn’t remember when he lost it, so we meticulously checked the aircraft inside and out; months later, it was found on the annual, trapped happily in a recess in the Harvard fuselage! Also, I carry a magnet on a long piece of string that I use to pick up hard to reach metallic items if required in my flight suit. These are just a few of the mistakes I have witnessed or heard of over the past ten years; however, a good 360* walk around and an excellent internal check cures most ills!
PRESTART
 We do have a checklist https://www.t6harvard.com/wp-content/uploads/2021/10/CHECK-LIST-Pdf.pdf – which is revision one on the website under ‘conversions training’; however, after ten years of operating the Harvard MK 4 G-BJST, I tend to do all of this from memory and use the pneumonic TTMMFFPPHHGGG, which covers everything for the prestart and pre-take-off checks where I repeat all of this.
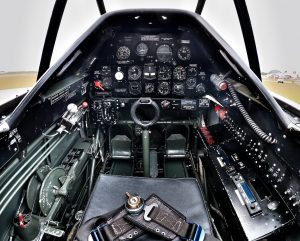
T Throttle friction – I check the Throttle friction is tight, which it is typically, no need to loosen this off at any time, but you never know what the previous pilot may have done. Ensure the throttle is set slightly cracked open; about 1 cm forward should do the trick for an excellent low idle start. Always worth doing this as when you transition to Merlin aircraft, this is a definite ‘must do’ item.
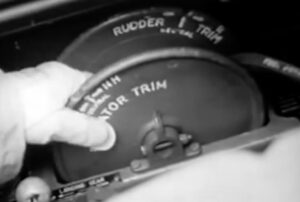
T Trimmer – Check the trims at about 11 o’clock and 2 o’clock. The Elevator trim should be at Eleven (E for elevator and eleven) and the rudder at Two o’clock, which provides a slight right bias as she will want to wander to the left on take-off.
 M Mixture & Mags – I check that the mixture is set to rich and the mags are off. On G-BJST, the mixture is rich when the lever is in the full aft position. However, you must be careful, as our previous Harvard 4 G-BUKY was rich when the mixture lever was fully forward. The thinking behind having it rich when fully aft was because a ratchet device in British and commonwealth service allowed the mixture to be pulled back to full rich when the throttle was closed. The theory was that a student would always land in a rich situation in case of a go-around. It makes total sense but can be deadly when swapping from NA 64 Yales, Texans and Harvard’s with different ideas.
 F Fuel – We need to get some fuel into her for the start, so grab the wobble pump and start wobbling forward and back, getting some pressure into the lines. Once the pressure is up and registering on the combination gauge, unlatch the Ki gas primer and start pumping while you keep wobbling with the other hand. I notice that many pilots wobble the hand pump and then prime however I do this simultaneously. Do not prime with the mixture in idle cutoff; all you’re doing is increasing the fire hazard. Generally, on G-BJST, we use five wet primes for a cold engine and two wet primes for a hot machine, and then I leave the primer in the fully out position in case I need it on start to add another slug of fuel into the manifold. Don’t forget to push in and lock when the engine runs sweet.
Click the image below to enlarge.
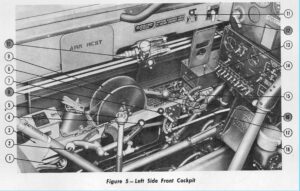 F Flaps – Use the hydraulic telescopic hand pump (Figure 5) to pump the flaps down and back up, checking hydraulic resistance when completing the exercise. I have done this twice, where I have felt no resistance on the pump and almost zero registering on the hydraulic pressure gauge, indicating that ‘yet another’ seal has died! Again, no apparent fluid leaks as the fluid bypass the seals and remains in the system; if this happens, this is a no go item, so abort the start and seek help from the maintenance.
P Prop – The prop (Figure 10) should be in the course position to the rear, as this is where it should have been positioned on shutdown. The Americans tend to leave the prop fine when they shut down; however, in the U.K. and on the S.O.P., we always shut down with the prop in course.
P Primer – Check the position of the primer, which is usually out of Pre-start. Remember, though, the primer should be back in and locked after starting, which is included in the after-start checks.
H Harness – Harness should be done with the harness lock off so you can move your body forward while doing the checks.
H Hatches – I would recommend opening at this point until the engine is running smoothly as this helps with communication with ground crew outside of the aircraft, and if there is a fire, you can get out quick.
GGG – Check all of the ‘Gauges Gyros and Gills’ – If it’s a cold day, I will have the Oil Shutter knob pulled out (Gills) to help warm up the engine.
THE START
 The battery is now set to the ON position along with the generator. After a good look around left and right and ensuring the entire front of the aircraft is clear, shout “Clear prop”. Engage the foot pedal starter down to the rear with your heel to the energised position for about 20/30 seconds; when you get a friendly harmonic tone, rock forward with your toes and engage the starter in the forward down. As the starter engages, count four blades as this big prop gains momentum, then turn the mags on to the on ‘both’, and she will fire. Now you’ll find out how well you primed. If you are under-primed, the smoke will be blackish. If you are over-primed, the amount you did so will be prominently displayed by a king-sized fireball going down the right side of the cockpit. If the fire persists, keep on cranking.
My pet hate is, at this point, hearing the engine pop bang, pop! This makes me cringe as the owner and the guy that pays the bills! This banging & popping is unnecessary and due to typically wrong starting procedure. This is typically due to an overzealous pilot who is often too quick to open the throttle before the engine has barely woken up. Allow the engine to start and fire on a couple of cylinders, be patient and don’t touch the throttle at this stage. The throttle should only be cracked open about one centimetre. I repeat, “Don’t touch the throttle” Pratt & Whitney didn’t build this engine that way.
As she fires and wakes up lumpy and rough at first, check the oil pressure, which should begin to rise within 30 seconds and then allow those nine cylinders to wake gently in their own time, ticking over at about 600 rpm, resisting the temptation to open the throttle! She’s an old girl and needs to wake up slowly and gently, allowing the oil to circulate this 22-litre beast. If she needs some extra fuel on start, push in the Ki gas primer and lock it, and that should be enough to allow her to continue to tick over at low rpm.
 When oil pressure has risen and shown an indication, slowly move the prop lever to fully fine and only then move the throttle forward “slowly” by a few millimetres at a time to achieve 1000 rpm. If you do any of this in haste, you will get the reward of a massive pop from the engine that echoes around the whole airfield and then a rapid rise in rpm as you have just moved the throttle too far forward. According to our S.O.P., the engine is permanently shut down in course pitch with the propeller lever in the full aft position. As the engine starts, the theory is that the oil goes to the engine first and not into the propeller hub, so this is another reason why we wait until the engine is running on all nine cylinders before pushing the propeller lever forward and allowing the piston barrel to open up and move forward letting the blades to go into the fully fine pitch. If you have your Harvard well positioned with the sun casting a shadow, you can see the shadow of the propeller barrel and piston moving forward as the prop changes pitch with its distinct sound as the blades move to a low pitch.
One of the most exciting things about warbirds is their variety. The T-6 utilises a Pratt & Whitney R-1340-AN-1 engine – all of them do. Yet, between the USAAC, USAAF, U.S.N., R.A.F., and RCAF, there are at least seven sets of operational numbers that I know of. These variances are not limited to oil temperatures, Manifold Pressure, and R.P.M. combinations – they also include airspeeds, flap speeds, and many other numbers. These aeroplanes all came off the same production lines, for the most part. It’s incredible what military forces will go through to build pilots.
 Once the temperatures are where they are supposed to be according to your Dash One, NATOPS, or Pilot Handbook, it’s time to taxi. They tell me that you’ve left the prop in coarse pitch when she starts to pop and belch. So pull the throttle back, push the prop up, and try again. Understand, that’s just what I’ve been told. I’ve certainly never experienced this myself… Honest!
Furthermore, with so many variations between the Harvard, Texan and S.N.J., they all have differences, and one for sure is the tail wheel operation. G-BJST has the modified “P-51” tailwheel. Push the stick forward, and it unlocks, pull it back, and lock into a steerable mode that allows 17 degrees of travel.
TAXI
As I previously mentioned during the walk around, before I get into the cockpit, I do a complete 360* walk around of the aircraft, survey the whole area, and check what’s immediately in front of me. Over the years, many pilots flying tail draggers have taxied into an obstacle they didn’t see because of the limited visibility from the cockpit. After the engine start and cleared to taxi, I always begin with a clearing turn; that is to say, I turn where possible around 45* one way, for example, right and look left and then do an almost static clearing turn to the left and look right before I begin the taxi to the hold. You never know, having checked your front before getting into the cockpit, that something or someone hasn’t appeared in your blind spot while doing your prestart checks!
 Now you are ready to taxi, so canopy back, “S” turning your way out to the runway, there’s no doubt you are working with a big piece of iron. You have 16* of tailwheel steering with the stick back as a pin locks the tail wheel. If you have to taxi from one surface to another, for example, grass too hard, do this at a 45* angle to lessen the drop and potential risk of a prop strike.
Using your rudder and the tail wheel pin engaged, you should have enough turning ability at most airfields to taxi to the hold. As soon as the stick is moved forward, you can feel resistance as you must physically go past this resistance to unlock the tail wheel. The pin in the tail wheel is very susceptible to side loads, and we don’t want to break it, so exercise caution when locking 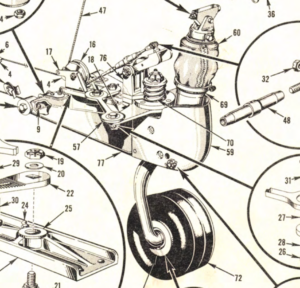 and unlocking it and avoid heavy use of the brakes to turn the aircraft when the tail wheel pin is engaged.
Click this link for the full article on the tail wheel by T6 Harvard Ltd
If you disengage the pin with forward stick, you must taxi the aircraft straight again with forward stick, allowing the tail wheel to be centralised before bringing the stick back to lock the tail wheel again.
When the pin is engaged, you can physically feel that when you taxi, there is more control over the rear end, and you can feel by the use of the rudders that the pin has locked in again, giving you tail wheel steering.
Suffice to say that taxing the Harvard takes practice, which should be done at a walking pace. If you need to brake during the taxi, throttle back to idle and gently apply the brakes. The Harvard isn’t known for nosing over; however, it could happen but remember we are getting in the good habits for the Hurricane and the Spitfire.
They say a picture paints a thousand words – The video below fully explains the tailwheel locking mechanism.
Right – With panels removed, you can see the tailwheel declutching mechanism. The pilot can steer the tailwheel (16° left and right) through the rudder pedals for taxiing. However, for very sharp turns, the pilot disengages the tailwheel steering and the tailwheel castors freely. This is done by pushing the control column fully forward (to disengage the tailwheel clutch) – and then using power and differential brake to turn sharply.
Whenever towing the Harvard (or the P-51), make sure the controls are locked. That way, the control column is fully forward, and you won’t damage the tail wheel unit if it tries to swivel.
RUN UP CHECKS
 Run-up again is normal; consult your manual of choice. Somewhere around 1600 rpm, cycle the prop and then a mag check at 2000 rpm. Run the flaps, and DO NOT forget to put them back up. When operating the flaps watch the internal indicator ‘soldier’ move and indicate full flap and watch it retract; also, take note of the hydraulic pressure which should read in the region of 800-1000 psi. The hydraulic gauge should read zero until the service is selected, and then you will see the pressure rise.
During the run-up, checks at high power if the machine starts to creep forward, throttle back to idle and slowly apply brakes. Remember, you may nose over if you break with power on, especially in the fighters! We are training for good habits here from the beginning of your training. Don’t forget some carb heat; look at the gauge and ensure you have seen a noticeable temperature rise, then go back to cold before take-off. Secure your cockpit – you can fly with the canopy open (another part of looking cool), and it’s windy in there sometimes.
TAKE OFF
I was once told that the take-off in the Harvard was a real adventure while the landing was a challenge. I would say this is true, and it takes practice to keep her running down the centre line on take-off and landing.
When you line up, give yourself plenty of room as you may have to unlock the tail wheel to get the aircraft on the centre line; if this is the case, you need to ensure that you have re-engaged the tail wheel lock before take-off. Generally, as I line up with the stick now fully aft, I creep forward and check with my rudder pedals that the tail wheel is fully locked before take-off.
 Having checked the windsock before take-off, I apply enough into the wind aileron as necessary with the sick fully aft; this aircraft has a prominent dihedral, so don’t allow the wind to get under the wing and lift it as she will for sure want to weather cock, and this is significantly worse with a breeze from the left!
As you roll out onto the centre line, double-check to make sure the tailwheel is locked, bring the power up smoothly and wait for the 600 horses smartly to 36 inches of Manifold Pressure. Listen to the growl – that’s the 12D40 prop tips going supersonic. Unless flying in formation, take-off is done at 36″/2250 RPM (See below engine management). Retract the gear once safely airborne. (Earlier models had a “Power Push,” so retraction was two movements; the later models had a Rube Goldberg device that pushed the Power Push for you when you moved the gear or flap levers.) As the gear retract, watch the internal indicators, twin soldiers move into the up position and also be sure that the greens have gone out. Sometimes the gear can be retracted; however, the gear has decided to stay down, so to save embarrassment, make sure you check all the indications.
 Many aeroplanes accelerate much faster than a Harvard, and because of sheer size, the Harvard feels almost as if it is lumbering along. However, your visibility isn’t nearly as bad as expected. Only the centre portion of the runway is blocked, so it is relatively simple to ease the rudder one way or the other to keep tracking straight. The aeroplane will fly off with little or no provocation from the pilot who thinks he’s in command. If you hoist up the tail vigorously, you’ll get a surprisingly quick swing to the left as the gyroscopic precession of the prop kicks in.
Taking off and landing on the grass is definitely more forgiving than taking off on a hard surface. Before we allow any pilot to go solo, they must demonstrate that they can take off and land on both hard and soft surfaces. I would say the hard surface is more difficult for the less experienced pilot as every control input is felt by the aircraft, and the pilot needs to react quickly with control inputs. I definitely prefer the grass runway as the owner and operator. We get substantially more life out of our extremely expensive tyres than landing the aeroplane on the hard runway.
ENGINE MANAGEMENT
A hotly debated subject, especially at airfields with noise abatement, is how much power should you use on take-off? A very experienced pilot once told me, “What does it say in the book” At our airfield, we have agreed for noise abatement purposes to do the first take-off of the day at full power 36 inches and 2250 rpm and then every other take off after that at a reduced rpm which works well. So when we talk about reduced power take-offs, we are looking at a minimum of 30 inches and 2000 rpm; however, I would exercise extreme caution and read the attached AAIB report of a similar incident referenced below.
Accident report –
https://assets.publishing.service.gov.uk/media/5422f9d340f0b613460007f3/dft_avsafety_pdf_502308.pdf
- Accident – In this report, the pilot used a reduced power setting of 30 ins M.A.P. and 2,000 RPM for the take-off to reduce the aircraft noise level. The acceleration was normal, but the aircraft ran over a bump in the ground and lifted off too slow a speed. The pilot put the aircraft back on the ground and continued the acceleration looking for an indicated airspeed of 75 to 80 M.P.H. before liftoff. However, The Harvard hit another bump and again lifted off; the pilot could not recall his precise airspeed, but the aircraft seemed to be climbing normally. He selected gear retraction but then felt the aircraft become “sluggish”. The aircraft then rolled to the right, and the right wingtip contacted the ground; The Harvard rotated about the wingtip and came to rest at right angles to the runway. The two occupants escaped from the aircraft as a fire started in the engine compartment. The A.F.S. were quickly on the scene and extinguished the fire.
 Another very experienced warbird pilot in the U.K. asked me why on earth would anyone want to do a reduced power take off in a Harvard, which is grossly underpowered and a high drag aircraft. He suggested always doing a full power take off as you have plenty of time after take-off to retract the gear and bring the power back to acceptable limits and all before the airfield boundary.
GOING THE DISTANCE WITH YOUR RADIAL
Another valuable factor for full power take-offs comes from an article by Covington Engines called appropriately “Going the distance with your radial’ which proves excellent reading, and here is an extract –
http://blog.covingtonaircraft.com/2015/07/07/radial-engines/
 Full Throttle Take-Off: This engine is equipped with a float type carburettor that supplies more fuel during take-off and very high power output than the engine needs for power production! This extra fuel is metered to the engine through an economiser valve (actually a fuel enrichment valve) with its own jet. This extra fuel cools the cylinder heads during the high power application. If a pilot doesn’t use full throttle for take-off, he is leaning the engine and possibly overheating the cylinder heads and exhaust valves! This can lead to an increased potential for head failure and sticking valves. If you can’t stand the full-throttle application, please consider 34.5 to 35 inches as a bare minimum!
Spread for Cruise: Develop a practice of not exceeding a “10 Spread” between engine revolutions per minute (R.P.M.) and manifold pressure as a maximum power setting for R.P.M. used. Example: 2000 R.P.M. – 30 inches manifold pressure maximum. 1900 R.P.M. – 29 inches M.P. maximum. Lower manifold pressures can be utilised but, beyond certain limits, may not be practical. For example, piston ring flutter at manifold pressures below 23.5 inches can cause accelerated piston and ring wear. In addition, piston ring flutter has produced very high crank-case vent pressure and related heavy oil venting overboard!
Approach Minimum MP: It is recommended to maintain one inch of manifold pressure for every one hundred R.P.M. while on approach for landing. Example: 1700 RPM – 17 inches manifold pressure minimum. If a pilot ‘chops’ the throttle during descent to land, he will ‘super cool’ or ‘shock cool’ the cylinder heads. This sets up tremendous stress in the aluminium head, and if done habitually, can lead to cylinder cracking.
GETTING AIRBORNE
 Power back for the climb; manifold pressure first, propeller next. I was taught this by “Rev up – Power down” in the order. Depending on whether your single ship or in formation, use 30 inches and 2000 R.P.M. in the climb. There are many moving parts up there in front of you, so be gentle with the power changes, and wait until you’re above about 400′ feet. I won’t go into the debate about what to do if the engine quits; know that the T-6 glides like a brick and weighs about 5,700 pounds. Think about it. The plane glides better than that, but this is the “square corner” of T-6 flying. Your options are limited shortly after take-off.
The aircraft will easily be airborne by 80 miles per hour because your best angle of climb (Vx) is 90 miles per hour. To minimise your exposure to trees and obstacles surrounding the airport, you will typically want to maintain 90 miles per hour in the climb until any potential obstacles have been cleared. You can then smoothly transition to the best angle of climb speed (Vy) which is 110 miles per hour, and smoothly bring the power back to climb power which is 30 inches of manifold pressure and 2,000 rpm.
As you climb out on your upwind leg, you probably will make some S turns left and right to clear the sky in front of you. As was the case taxiing on the ground, you cannot see over the nose, so you have to see around the aircraft’s nose.
See the below video which demonstrates how the emergency hydraulic gear system works. This also shows the gear locking mechanism and gear release.
SHUT DOWN
![]()
 While taxiing in, go through your oil-scavenging technique. Again, even aircraft with the same engine and the same prop have different methods. First, idle the engine to let everything settle (do this at whatever R.P.M. your book says – I use 1450 rpm and wait 1 minute), then pull the propeller back to course pitch and wait until the sound changes. If you’re parked in a way that you can see the shadow, you can watch the barrel retract into the cylinder, and that’s when you can pull the mixture to idle, cut off and kill the engine.
Battery and Generator – Off. Lock the controls to rig for the tow; I always say aloud, “Battery off, Mags off, Control lock-in” we don’t apply the parking brake as it sticks on, and we always leave the fuel on.
They built over 15,000 of these things. Think of all the young men that sat in the seat you’re in right now. So there’s a lot of history under your seat, in particular, this Harvard who has trained thousands of military and civilian pilots that have gone on to fly almost every type of military fighter from props to jets, so respect her; she’s earned it!
Information from the “The USA Navy training film 1953.”
Your Harvard is in the take-off position, and you have advised your instructor that the tail wheel is locked, and you are ready for take-off. Look around and make sure there are no other aircraft landing or taking off or where there is tower clearance.
 You release your brakes and put your heels firmly on the deck; you then advance the throttle smoothly but positively to the sea level stop while holding the stick slightly back of the neutral position, which keeps the tail down and allows the tail wheel to remain in the locked position to assist in maintaining directional control. Pick an object on the horizon for a reference, and remember that engine torque will tend to pull the nose to the left as take-off power is applied, be quick to correct this and any other swerve.
 As your speed increases, maintain directional control with your rudders and ease the stick forward. This is the take-off attitude and is held throughout the take-off run.
 As you approach take-off speed, maintain the Take-off attitude exerting back pressure on the stick as necessary, the aircraft will leave the ground. As soon as you are safely airborne and have cleared all obstacles, safely retard the manifold pressure to 30 inches and the rpm to 1950 and climb at 110 mph assuming a normal climb attitude, adjusting trims as necessary and climbing out straight ahead.
At approximately 100 feet or when you have cleared the end of the runway, whichever comes first, retract your undercarriage when flaps are used, raise those at 200 feet above the terrain, and at 250 feet if traffic permits, start your turn out of the field.
ENGINE LIMITATIONS HARVARD 4 G-BJST
Maximum take-off power settings can be done at 36 inches and 2250 rpm with the engine fully rich for a maximum of 5 minutes. You are burning 56 imperial gallons per hour (P38). The good book E.O. 05-55A-1 states that for take-off, you should smoothly advance the throttle to full take-off power of 32 inches manifold pressure and 2200 rpm this is also the maximum rich, continuous power setting. At this power setting, you are burning 48 imperial gallons per hour.
At normal cruise settings, you should be in the region of 29 inches and 1925 rpm, and this will give around 30 imperial gallons per hour fuel burn (p38)
Handling Reference:
Pilots Operating Instructions Harvard 4 EO 05-55A-1, RCAF 1953 Pilot Operating Handbook for G-BJST
Engine Limitations:
Minimum cylinder Head Temp for take-off: 120°C
Maximum Cylinder Head Temp: 260°C
Take-off: 2250rpm / 36″ mp for a maximum of 5 minutes
Climb Power / best rate of climb speed (Vy): 2000rpm / 30″ mp / 110mph
Cruise power / speed for maximum range: 1500rpm /26″ mp / 126mph
Oil System
Type of oil used: D100 detergent oil (to be confirmed with reference to the front page of the tech log)
Oil capacity: 8 US Gals (37ltrs)
Minimum oil quantity: 6 US Gals (30ltrs)
Minimum oil temp. for take-off: 40°C
Normal oil pressure airborne: 70-90psi
Minimum oil pressure airborne: 50psi
Fuel System
Maximum fuel capacity: (only obtainable in horizontal attitude) 42.5 Imp. gals. (193lts) in each wing (no auxiliary tank fitted)
Normal fuel pressure: 4-6psi
Low-pressure warning light: 2¾psi
Hydraulic system
The hydraulic fluid used: Aeroshell 41
Hydraulic pressure: (service selected) 800-1000psi
Hydraulic pressure: (no service selected) 0psi
24 Volt Electrical system
Maximum operational limit: 50Amps